AUSTRALIAN CUB SCOUT
GOLD BOOMERANG REQUIREMENTS
Part 4 – Outdoor Scouting
(Outdoor Scouting)
| Compass and Navigation | ||||||||||||||||||||||||||
| Use a compass to plan a bushwalk route on a map. |
As long as you know how to place the compass on the map to align the north on both the compass and the map, this should be easy. However, if not, ask you Scout leader – or even one of the scouts.
|
|||||||||||||||||||||||||
| Use a compass to set a simple trail, including 6 compass points, for the rest of the Pack. |
While one leader runs a game for the rest of the pack, the gold cubs can go outside and set a course in the yard/park etc. The rest of the pack can follow this course. Even better if numbers allow, have more than one course being set, so the gold cubs can participate in following a trail set by one of the other cubs.
|
|||||||||||||||||||||||||
| Discuss the 8 principal points and associated degrees. |
|
|||||||||||||||||||||||||
| Maps and Hiking | ||||||||||||||||||||||||||
| Explain at least 8 map symbols and be able to find them on the map |
Fortunately, the symbols on a map are identified in the "key" – usually in the corner or on the back of the map, so this should be easy enough.
|
|||||||||||||||||||||||||
| Explain scale and contour lines |
The scale is found on the map, and gives you a way to estimate or caclulate the distance between two points. As each map is different, you will need to look at the map to know what the scale is. Eg. 1cm on the map may be the same as 1 Km in the real world. Contour lines join points of equal height, so as you look at a map you can tell how steep a hill is by how close together the contour lines are.
|
|||||||||||||||||||||||||
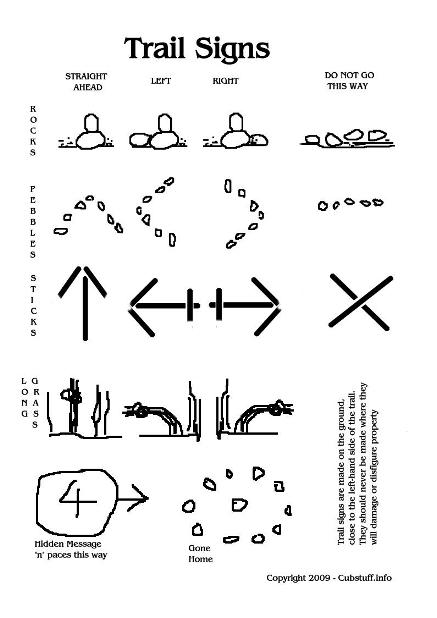
| Using at least five different ‘trail signs’ make a track for the rest of your pack to follow. |
This test can be done much the same as the compass trail above.
Trail signs are made on the ground, close to the left-hand side of the trail. They should never be made where they will damage or disfigure property
|
|||||||||||||||||||||||||
| Fire Lighting | ||||||||||||||||||||||||||
| Explain about different types of cooking fires and demonstrate at least one. |
The following information is extracted and part-reproduced from Wikibooks I have reproduced rather than just linked as I have had trouble with linked sites vanishing over the years, and I do not want to lose this valuable information. I also only need part of the information on that page. If I have infringed YOUR copyright and it needs removing, please let me know and I will change it to a link only 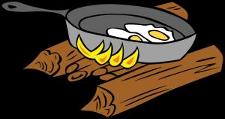 The Hunter’s Fire - The hunter's fire is a cooking fire. The logs on top are spaced close enough together such that a pot, pan, or dutch oven can be placed on them. Try to lay it as level as possible.
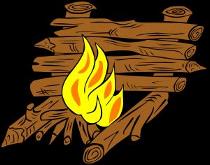 Reflector fire - This fire can be used for baking, though it is not as efficient as a reflector oven (which is has a metallic reflecting surface and often surrounds the item. The fire itself can be of any other form, and is placed in front of the reflector. The item to be baked is placed between the reflector and the fire. This fire is also good for getting oneself warm. The reflector can also be a large rock. If you sit (or sleep) between the reflector and the fire, the side of you facing the fire will be warmed directly, while the reflector throws heat to the opposite side. Very toasty.
If making the reflector from logs, the vertical members should be driven deeply into the ground to support the weight of the horizontal members. You can also use rocks to support them.
Reflector fire - This fire can be used for baking, though it is not as efficient as a reflector oven (which is has a metallic reflecting surface and often surrounds the item. The fire itself can be of any other form, and is placed in front of the reflector. The item to be baked is placed between the reflector and the fire. This fire is also good for getting oneself warm. The reflector can also be a large rock. If you sit (or sleep) between the reflector and the fire, the side of you facing the fire will be warmed directly, while the reflector throws heat to the opposite side. Very toasty.
If making the reflector from logs, the vertical members should be driven deeply into the ground to support the weight of the horizontal members. You can also use rocks to support them.
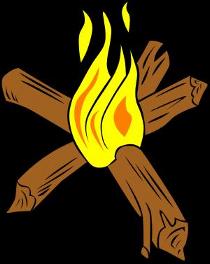 Star fire - The advantage of this fire is that the logs can be of any length, avoiding the need to cut them up. As the ends of the logs burn, they are pushed into the fire. The fire is lit at the centre of the star. If the logs are propped up on the fire ring, gravity will feed them in as they burn.
|
|||||||||||||||||||||||||
| Outdoor Cooking | ||||||||||||||||||||||||||
| Using your cooking fire, prepare a meal for yourself and an adult consisting of meat/fish, vegetables and a hot drink. |
This is easiest if done on a pack camp, but can be part of a special activities night at the hall or park.
|
© 2008 Ian Moggs - rights are given for copying and printing for personal use or use in cub-scout or similar groups.